Oh yes, Circle().trim was one of the first things I noticed wasn’t going to translate, which is why I never offered anything. OP asked for a translation, not alternatives, so I simply didn’t reply. But then some ChatGPT baloney came into play.
Sub Paint(g As Graphics, areas() As Rect) Handles Paint
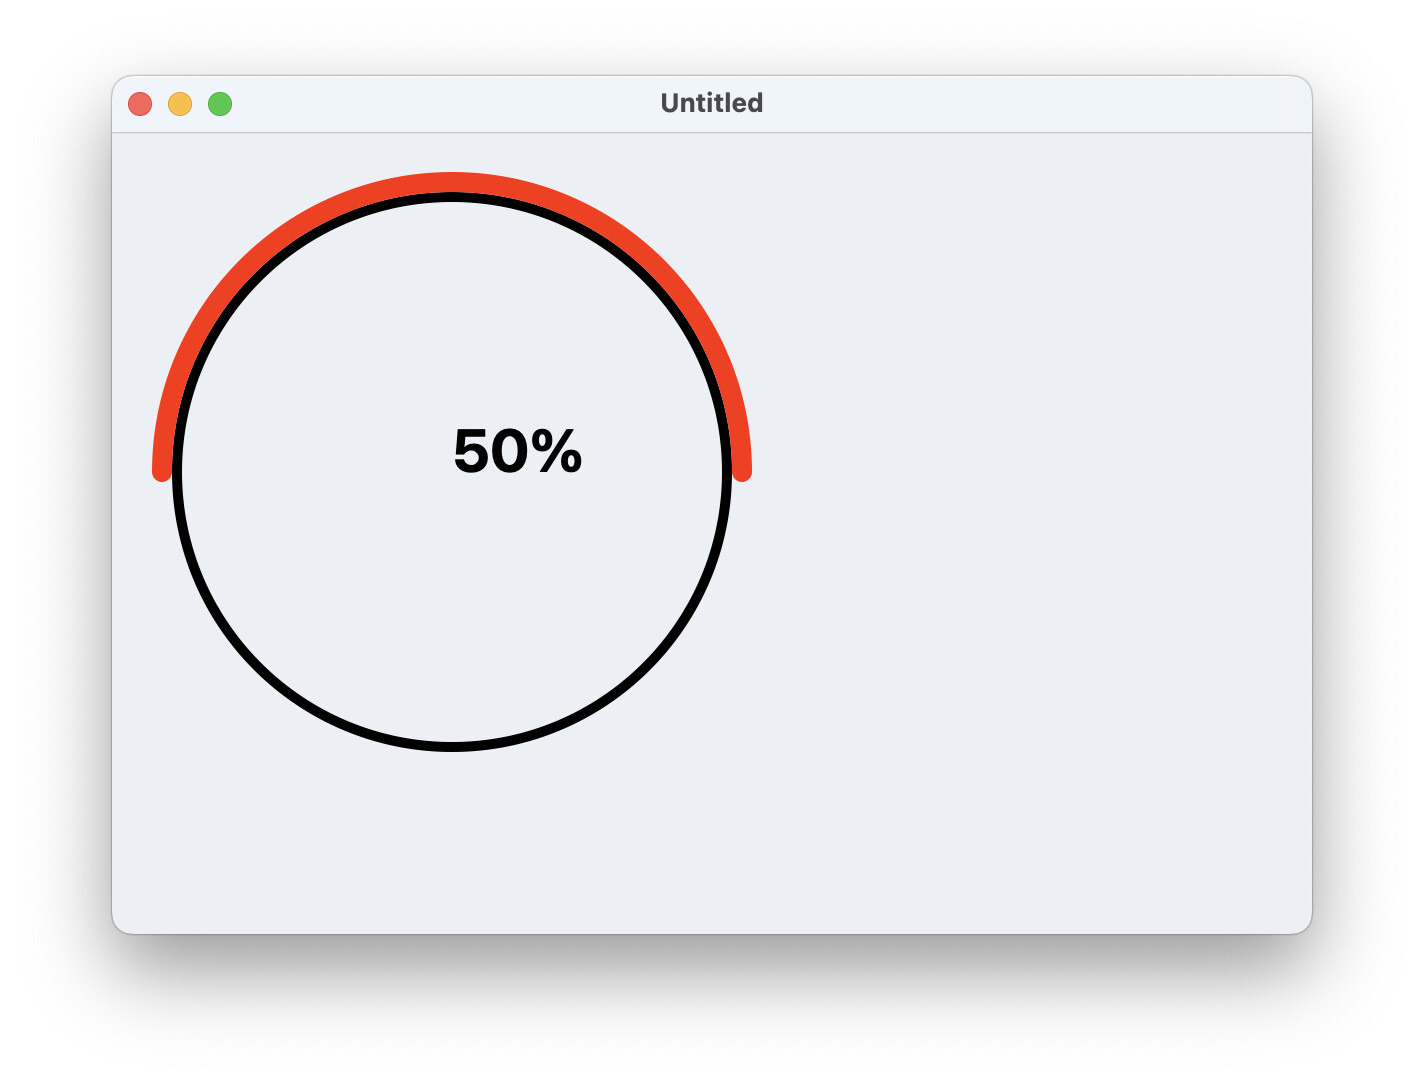
// Define the progress
Var progress As Double = 0.5 // Change this to your desired progress
// Define the colors
Var progressColor As Color = Color.RGB(0, 0, 0) // Change this to your desired color
Var accentColor As Color = Color.RGB(255, 0, 0) // Change this to your desired color
// Draw the background circle
g.ForeColor = progressColor
g.PenSize = 5
g.DrawOval(0, 0, g.Width, g.Height)
// Draw the progress circle
g.ForeColor = accentColor
g.PenSize = 10
Var path As New GraphicsPath
path.AddArc(g.Width / 2, g.Height / 2, g.Width / 2, 0, progress * 2 * 3.14159, True)
g.DrawPath(path)
// Draw the percentage text
g.ForeColor = progressColor
g.FontSize = 30
g.Bold = True
g.DrawString(Str(progress * 100) + "%", g.Width / 2, g.Height / 2)
End Sub
hope it get’s you closer to what you need. code generated by chatgpt4 & it works.
Sub Paint(g As Graphics, areas() As Rect) Handles Paint
  // Define the progress
  Var progress As Double = 0.1 // Change this to your desired progress

  // Define the colors
  Var progressColor As Color = Color.RGB(0, 0, 0) // Change this to your desired color
  Var accentColor As Color = Color.RGB(255, 0, 0) // Change this to your desired color

  // Define the padding
  Var padding As Integer = 10

  // Calculate the size and position of the ovals
  Var ovalWidth As Integer = g.Width - 2 * padding
  Var ovalHeight As Integer = g.Height - 2 * padding
  Var ovalX As Integer = padding
  Var ovalY As Integer = padding

  // Draw the background circle
  g.ForeColor = progressColor
  g.PenSize = 5
  g.DrawOval(ovalX, ovalY, ovalWidth, ovalHeight)

  // Draw the progress circle
  g.ForeColor = accentColor
  g.PenSize = 10
  Var path As New GraphicsPath
  path.AddArc(g.Width / 2, g.Height / 2, (g.Width - padding) / 2, 0, progress * 2 * 3.14159, True)
  g.DrawPath(path)

  // Draw the percentage text
  g.ForeColor = progressColor
  g.FontSize = 30
  g.Bold = True
  g.DrawString(Str(progress * 100) + "%", g.Width / 2, g.Height / 2)
End Sub
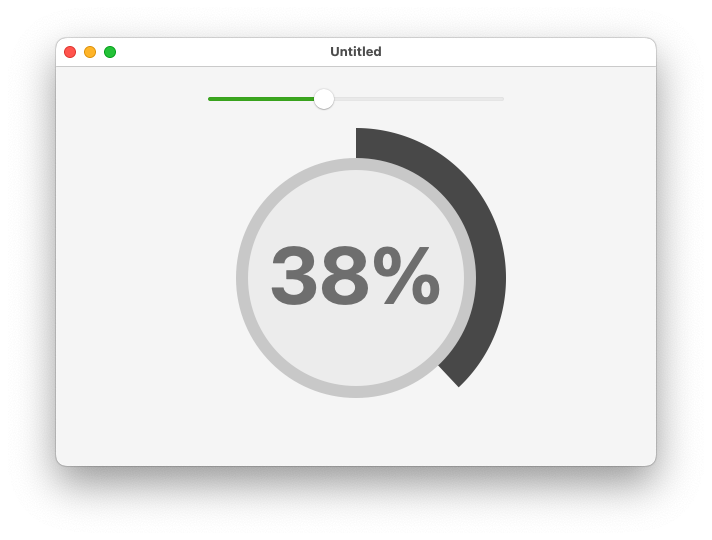
Window1.Controls.CircularProgressView.Paint
Sub Paint(g As Graphics, areas() As Rect)
dim circle As New GraphicsPath
dim circle_outer As New GraphicsPath
dim circuleFrameWidth as integer = 85
dim circuleRadius as double = circuleFrameWidth/2
dim padding as double = 10*.7
dim deg2Rad as double =atan(1)/45 // Needed to work in degrees, Xojo path.Arc only acepts radiants
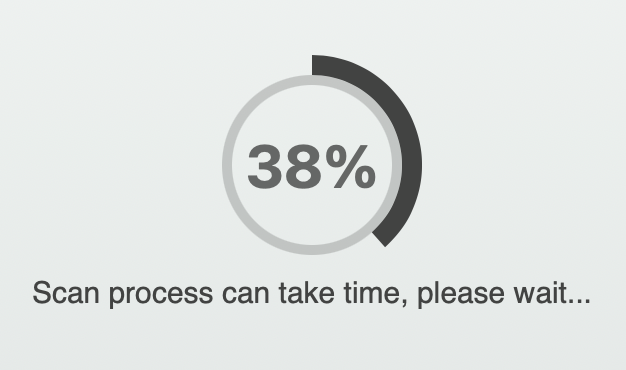
dim progress_percent as double = percentSlider.Value //38 // percent
dim startDeg, endDeg, adj_placementDeg as double
dim progressColor As Color = color.DarkTingeColor // Change this to your desired color
dim accentColor As Color = color.HighlightColor// Change this to your desired color
adj_placementDeg = -90
startDeg = 0 + adj_placementDeg // Figures out the start of arc and then adjust for perfered starting point
endDeg= (360*(progress_percent/100) ) + adj_placementDeg // Figures out the end of arc adjusts for perfered starting point
g.LineCap =Graphics.LineCapTypes.■■■■ // Place a but on stroke.
// Base Circle
g.SaveState
circle.AddArc( g.Width/2, g.height/2, circuleRadius, 0, 360*Deg2Rad, true )
g.DrawingColor = progressColor
g.Transparency = 30
g.PenSize=5
g.DrawPath( Circle )
g.RestoreState // revert back to default state
// Percentage/Progress/Outer Circle indicator
circle_outer.AddArc( g.Width/2, g.height/2, circuleRadius+padding, startDeg*Deg2Rad, endDeg*Deg2Rad, false )
g.DrawingColor = accentColor
g.PenSize=10
g.DrawPath( Circle_outer, false )
// Text in Center, this is not the correct way to center text, only to show example.
dim textSize as double = circuleFrameWidth*.36 // made up text size based on percentage of circuleFrameWidth
g.Bold=true
g.FontSize=textSize
g.DrawText( str(progress_percent)+"%", (g.Width/2)-textWidth ,(g.height/2)+textSize*.5, 0 )
End Sub
percentSlider.ValueChanged:
Sub ValueChanged()
CircularProgressView.Refresh
End Sub
Simply draw the portion of the circle corresponding to the value and then draw filled circles over it to create the desired illusion. Here’s how I’ll do it
Create a method with parameter, for example SubGauge(g As Graphics, value As Integer)
From the Paint of a Canvas pass g or the clip of the desired part to the method with the value to display, for example SubGauge(g,Slider1.Value)
Public Sub SubGauge(g As Graphics, value As Integer)
  Var a As New ArcShape
  Var x,y,size As Double
  Const PI=3.14159265358979323846264338327950

  // Find the center of the graphic and the maximum square size
  size=Min(g.Width,g.Height)
  x=g.Width/2
  y=g.Height/2

  // Sets the color of the gauge
  g.DrawingColor=Color.RGB(64,64,64)

  // Draw the gauge
  a.Width=size
  a.Height=size
  a.Rotation=270*PI/180
  a.arcAngle=Min(value*3.6*PI/180,2*PI-.0000001) // Value need to be 0-100 => x 3.6 = 0-360°
  a.startAngle=0
  a.FillColor = g.DrawingColor
  g.DrawObject(a,x,y)

  // Sets the color of the circle
  g.DrawingColor=Color.RGB(196,196,196)

  // Sets the thickness of the gauge, e.g. 10%
  Var tg As Integer = size/10
  g.FillOval(x-size/2+tg,y-size/2+tg,size-2*tg,size-2*tg)

  // Sets the color of the inner circle
  g.DrawingColor=Color.RGB(234,234,234)

  // Sets the thickness of the inner circle, e.g. 3% = tg-3%
  Var tc As Integer = size/7
  g.FillOval(x-size/2+tc,y-size/2+tc,size-2*tc,size-2*tc)

  // Finding the maximum displayable size for 100%
  g.Bold=True
  g.FontSize=150
  Var w As Double
  Do
    g.FontSize=g.FontSize-1
    w=g.TextWidth("100%")
  Loop Until w<size-2*tc Or g.FontSize<8

  // Sets text color
  g.DrawingColor=Color.RGB(102,102,102)

  // Set text position
  Var s As String = value.ToString+"%"
  w=g.TextWidth(s)
  x=(g.Width-w)/2
  y=g.Height/2+g.FontAscent/3
  g.DrawText(s,x,y)
End Sub
Another solution is to set the FillOpacity of the ArcShape to 0 and then draw the border with a BorderOpacity of 100.
Then you don’t need an extra cover circle.