Function PaintCellText(g as Graphics, row as Integer, column as Integer, x as Integer, y as Integer) Handles PaintCellText as Boolean

' This PaintCellText event handler is designed for a DesktopListBox, specifically targeting column 2,
' where filenames/URLs are displayed. The primary goal is to ensure that the end of the string is always visible
' to the user, even when the full text exceeds the available width of the cell. This is particularly useful
' for long paths or filenames, where the most distinguishing information (such as the file extension or unique
' end characters) is at the end of the string.
'
' The code dynamically adjusts the text's starting draw position to right-align within the cell, ensuring
' the end of the text is visible first. If the text width surpasses the cell's width, an ellipsis ("...") is
' prepended to the visible portion of the text as an indication that the text has been truncated.
'
' This approach enhances the UX by prioritizing the visibility of critical parts of filenames, paths, or URLs
' in contexts where the beginning of the text (often a repetitive directory path) is less
' important than the end. It also maintains a clean and consistent appearance by vertically centering the text
' within each cell and adding a slight padding from the edges for readability.
'
' Key Features:
' - Right-aligns text in a specific column (column 2) to show the end of the text clearly.
' - Automatically adds an ellipsis to indicate text truncation when necessary.
' - Ensures text is vertically centered within the cell for a polished look.
' - Utilizes high-quality anti-aliasing for crisp, clear text rendering.
'
' This event handler should be connected to the PaintCellText event of a DesktopListBox control.

If column = 2 Then ' Targeting the specific column, adjust this value to the column number in your listbox containing the string to be affected
    Var cellText As String = Me.CellTextAt(row, column)
    Var fullTextWidth As Double = g.TextWidth(cellText)
    Var ellipsisWidth As Double = g.TextWidth("... ")
    Var availableWidth As Double = g.Width - 5 ' 5 pixels for right padding

    ' Determine if the full text width exceeds the available cell width
    If fullTextWidth > availableWidth Then
      ' The text needs to be truncated; prepare to draw an ellipsis
      Var truncated As Boolean = True
      ' Calculate how much of the text can be shown, prioritizing the end of the string
      Var textToShow As String = "..." + cellText
      Var newTextWidth As Double = g.TextWidth(textToShow)

      ' Keep removing characters from the start of the textToShow until it fits
      While newTextWidth > availableWidth And textToShow.Len > 3
        textToShow = "..." + textToShow.Right(textToShow.Len - 4)
        newTextWidth = g.TextWidth(textToShow)
      Wend

      ' Calculate new X position for the text, to start drawing from the left
      Var newX As Integer = 0

      ' Adjust vertical alignment
      Var newY As Integer = (g.Height - g.TextHeight) / 2 + y

      ' Draw the truncated text with ellipsis
      g.DrawText(textToShow, newX + 5, newY) ' Adding a slight padding from the left edge

    Else
      ' The full text fits within the cell, draw it normally aligned to the right
      Var newX As Integer = availableWidth - fullTextWidth

      ' Adjust vertical alignment
      Var newY As Integer = (g.Height - g.TextHeight) / 2 + y

      ' Draw the full text
      g.DrawText(cellText, newX, newY)
    End If

    Return True ' Indicates custom drawing is handled
  End If

  Return False ' Allows default drawing for other cells/columns

End Function
5 Likes
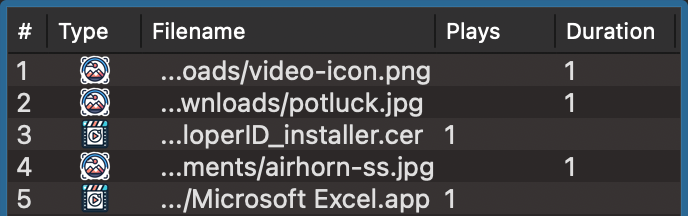
You can see the effect this code has on the text in the Filename column below:
1 Like
I once did something similar (left aligned). Maybe my (very simple) approach will give you more ideas?
I just want to offer suggestions, not question your code. ![]()
Function PaintCellText(g as Graphics, row as Integer, column as Integer, x as Integer, y as Integer) Handles PaintCellText as Boolean
  If Me.CellTextAt(row, column).Trim <> "" Then
     If g.TextWidth(Me.CellTextAt(row, column)) > g.Width Then
      g.DrawText(Me.CellTextAt(row, column).Trim, 0, y, g.Width-60, True)
      g.DrawText(Me.CellTextAt(row, column).Trim.Right(7), g.Width-60, y, 60, True)
      Return True
    End If
  End If
End Function
2 Likes
have also a look at TextShape object
2 Likes
Thanks for sharing! This is a great approach too, very clever.
1 Like