That appeared to work although it didn’t include the version number.
I’ll try compiling example 20-3 and see if it works that way. Would suck if it has to be compiled each time to test and if it won’t work under remote run/debug.
That appeared to work although it didn’t include the version number.
I’ll try compiling example 20-3 and see if it works that way. Would suck if it has to be compiled each time to test and if it won’t work under remote run/debug.
If the program shows ‘pigpio initialized okay’, then the sudo systemctl status pigpiod command result does not matter. The status command is only to check for the initial setup, thats all. The most important result is when running Xojo to show ‘pigpiod initialized okay’ .
Well done.
I will be back on the forum tomorrow night. Have a good night!
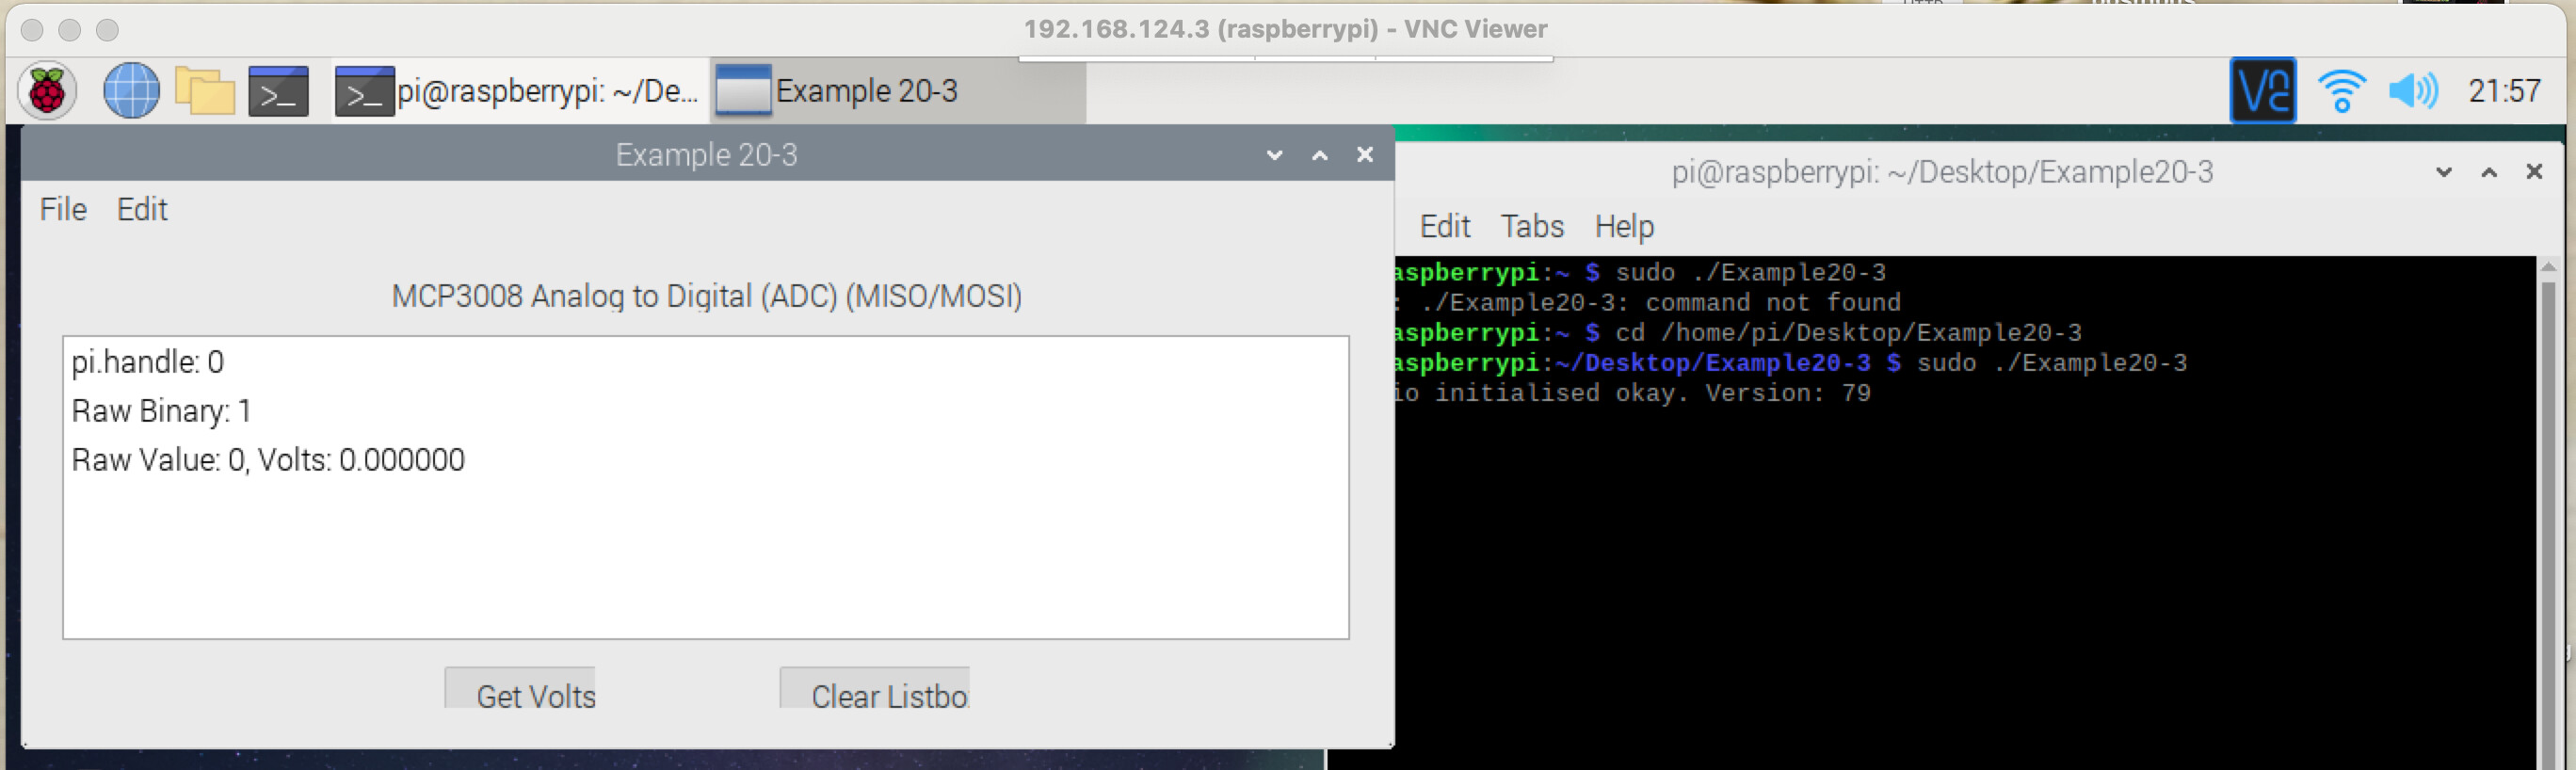
Ok Eugene, here is what I discovered. Maybe you can try this on your end just to see what happens. That way we’d know if it’s just something on my Pi or if it’s just the way it is.
I added a line to your code to output the pi.handle:
Listbox1.AddRow("pi.handle: " + pi.Handle.ToString)
I put this in the Open Event and in the Read_MCP3008 method.
When I compile, move the app to the pi and then execute the app in the terminal this is what I get:
The terminal says pigpio is okay, the pi.Handle is 0 and the code apparently works. I can click Get Volts and a number shows up. Although technically it’s not working becuase I get 0 no matter where the pot is set. So perhaps it’s still not reading anything from the SPI. But one issue at a time. That could be a wiring error. I still need to check that.
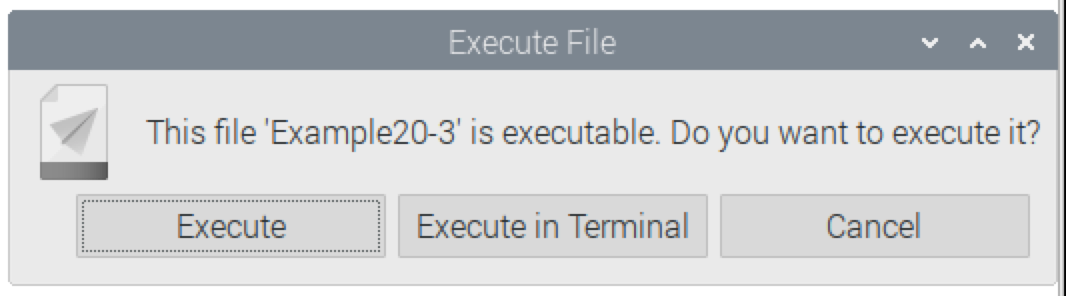
OK, when I then run the app by double clicking on it and hitting “Execute”… like this:
I get a pi.handle of -2003 and if I hit Get Volts it crashes:
And the same thing happens if I use the Remote Debugger tool to run the app remotely. It gives me -2003 as the pi handle and crashes when it hits the pi.spi_open.
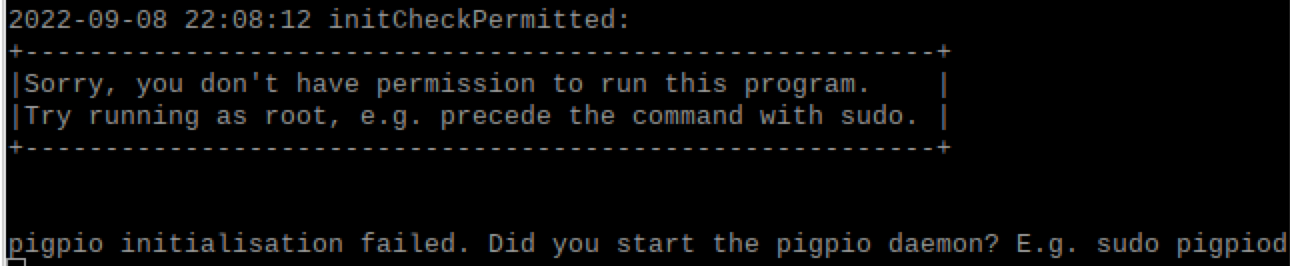
Now the other thing I tried which might give us a clue, is that I tried double clicking and then hitting Execute in Terminal. That also gives the the -2003 pi handle but offers this info in the terminal:
And that I think is telling us the difference. When hitting “Execute” and when doing remote debug it isn’t being run with sudo as root. And there must be some permissions thing going on.
Good morning,
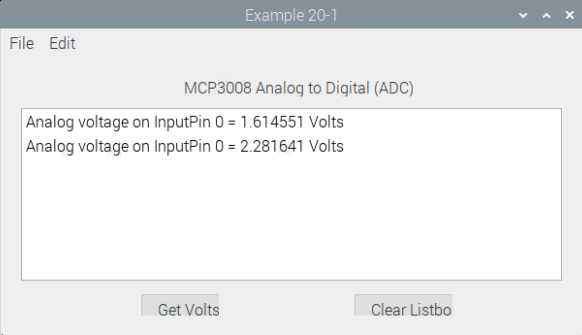
I will be offsite for about 12 hours. Your example with the 0.0000 voltage seems really close. I ran example 20-1 with the wiring diagram for MCP3008 and it works perfectly.
For some reason (a driver update maybe?), Example 20-3 doesn’t work with the MCP3008, and I will look into the reason why. There seems to be continuous updates and this is a never-ending game. ![]()
For now, please use Example20-1, and I believe it should work.
Edit: Continuous updates are the reason why I usually develop my own boards and software, as updates from third-party vendors can be nauseating. Although I appreciate updates, breaking existing software is not professional. Once a program has been created, I usually keep the same program version so that breakage does not happen. This seems to happen on many programming languages, not just Xojo.
On your Example 20-3 not working. That’s actually good to hear. I double checked all my wiring and dove into the code. And last night and posted some questions about it and your code but decided to delete it figuring I just had it wrong. But I did find something you might want to look at. Not sure if this is anything or not…
Your code to read the 3008 is here (with my added listbox adds):
Var Data as UInt32

Dim txBuf as New MemoryBlock(4)
txBuf.UInt32Value(0) = 1
Dim rxBuf as New MemoryBlock(4)
rxBuf.UInt32Value(0) = Bitwise.ShiftLeft((8 + channel), 4)

//Sends and receives data from SPI device
//adc = handle, txBuf = transfer data to SPI,
//rxBuf = receiving data from SPI
//data contains the number of returned bytes (8 in this case)
data = pi.spi_xfer(adc, txBuf, rxBuf , 8)
//Returned data is an array of returned number of bytes
Listbox1.AddRow("pi.handle: " + pi.Handle.ToString)
Listbox1.AddRow("data: " + data.ToString)
Listbox1.AddRow("Raw Binary: " + rxBuf.UInt32Value(0).ToBinary)

//Format the data specific to the MCP3008 chip
Var m as New MemoryBlock(4)
m.Byte(0) = rxBuf.Byte(2)
m.Byte(1) = Bitwise.BitAnd(rxBuf.Byte(1),&hF)
Var value as Int32 = Bitwise.BitAnd(m.UInt32Value(0), &h3FF)

return value //returns raw value
So you’re sending parameters in the txBuf and the rxBuf and data is returning the number of bytes. And you’re mining the value out of the rxBuf. Which I found confusing because it’s labeled rxBuf but you’re sending bytes in there.
But this code example from here looks like this:
    def read(self, channel = 0):
        adc = self.spi.xfer2([1, (8 + channel) << 4, 0])
        data = ((adc[1] & 3) << 8) + adc[2]
        return data
It’s in python (which I don’t really know) and other than the 0 at the end where you have an 8, they are sending the same parameters but mining the value out of data.
Just thought it might be something to check into. Should txBuf have all the sending bytes in it? And rxBuf only be a return buffer? Or is the method the same as the python library where it returns the data?
Meanwhile…
I’m going to try to get the pigpio to work from remote run using the remote debug tool. Because I can’t spend 2 min manually moving the compiled app over every time I need to test it. And I’m also about to try your example 20-1. I’ll let you know what happens.
Thanks again!
Ok solved the first problem. And this probably also solves my original post about the ADS115 not working either. But at this point I’ve already rewired things up for the 3008, so i2c will have to wait.
But the issue was that when my app initialized pigpio it would fail and return a pi.handle of -2003. Then when I tried to initialize i2c or spi it also returned an error code of -2011, because pigpio didn’t initialize, the i2c couldn’t start.
The reason this was happening was because I wasn’t compiling and moving the app over and running it in the terminal with sudo. Instead I was using the remote debug feature to test the apps on the pi. And for some reason an app using pigpio has to be run as root.
The solution was to run the Remote Debugger Desktop app on the pi in terminal using sudo…
Now when you remote run the xojo app it is also being run in the terminal, you have permissions and can see the output. So probably this would have solved the i2c issue above.
When I’m done with the app and compile it, it will need to be run in terminal using sudo. But it would be easy to test for this in the app and pop up a dialog box telling the user to quit and run it the other way.
I expect to have the 3008 working later today also. I’ll post an update.
Also… when my entire project is done I’ll link to the video here. This project is a 13"x9" plotter (I call it a robot) that paints large murals on a wall. All written in xojo for pi and using gpio.
Until 5 min ago I was still getting all zeros. I had checked and rechecked the wiring. I was about to write my final “please help” for the day, and decided to track the wires one more time. And yes, pins were revered. I think some bad soldering contributed also, but for sure the wires being crossed. Anyway it now works. Thank the maker.
And also thank Eugene for writing the book and being available to help debug this with me.
Now everything is golden. I can use run remote to debug, and the spi is working great.
FYI - This pot is providing feeback from the pen device for the amount of pressure the pen has against the wall. It will allow the pen to have consistent pressure, or be a consistent distance away from the wall even if the wall isn’t always exactly the same distance from the robot, or in the case of any texture on the wall.
Michael
I am going to try some other code to get Example 20-3 working again. Thanks for the code which uses xfer2 and it will require a little more digging on my part to figure it out.
Glad that you have it working ![]()