[quote=67071:@Sam Rowlands]Hi Emile,
Scaling is done differently on the Mac as it is to Windows. / as frankly the scaling in Windows looks terrible![/quote]
Oh yes, I saw that everyday. There is a huge difference on scaling with the average paint program and scaling using PhotoShop or so
Oh yes, and besides that it real matters what contents need to be scaled down. With respect to text youre completely right the Preview downscale looks best. But notice that it influences the density of image details the text is not completely black anymore, but grey. While this is exactly right for legible text resizes, it would look terrible if done to a bitmap image.
Has anyone tried out CoreGraphics on the Mac like proposed by Sam? MacOsLib contains the CoreGraphics definitions.
In fact, it is done on a 72 dpi png file (exported from the pdf file with Preview at 150 dpi).
Preview downscale looks best
Same apply for an icon pasted at 512 x 512 in Apps Icon: better do the resize elsewhere than using Xojos built-in feature.
The awesome thing is, you don’t need to do anything special on the Mac to get this, Xojo already uses Core Graphics, there is a declare for adjusting the quality of the scaling. However simple using Xojo function in a Mac app and you already get the power of CoreGraphics.
If you want to draw icons, I would recommend using NSImage however, either via the Retina Kit or via the MBS plugin or MacOSLib, as the system will then choose the most appropriate icns resource to draw for you.
I took some minutes to run my program to demonstrate how bad the scaling properties are bad under Windows (XP):
Remember: the project that leads to this screen shot does nothing special:
it loads, resize and display the same image using Xojo native routine and the shared code far above,
loads and displays the same image, resized using 0S X 10.8.5 Preview (far right).
You can now see the differences between OS X and Windows (certainly because Xojo calls a OS API to do the resizing).
Now, we can see the improvement (but still can do better) from native Windows XP and Apples Preview.
Of course, to better see the improvements / differences, load the image and watch it locally (its size is 858 x 414 vs the displayed size).
@Sam: What is that declare? I guess were not talking about graphics.drawpicture here? If there is there should be an easy way to enhance Emiles native Xojo results by choosing the appropriate render intent, I think ?
And did I read your words correctly that if I chose for example systemicons via MacOSLib the OS will hand out the appropriate graphics for retina or standard displays without me having to do anything?
@ Emile: This brings us back to the wish for native vector graphics handling, I guess. Downsizing text is a very critical thing remember the hints PostScript fonts use to create a sharp look even when the text size is about 5 pts.
Ok, after taking some time to look at the ImagePlay scale algorithm, I’ve decided to see if I cannot perhaps revise the algorithm. Here a few things I changed:
The Alpha Channel (Mask) is now also scaled and included in the result (scaling no longer looses transparency.
Instead of using 4 adjacent pixels for averages, I used the 8 pixels adjacent to each pixel.
It turns out that the these changes is now scaling at a quality that satisfactory for my own projects. The scaling is also in pure Xojo code, so I can avoid inconsistencies across different platforms by using platforms specific APIs.
Here is a screenshot of the results:
It looks like the OS X side of the Xojo framework does have a good handle on scaling, so I suppose the OS X people would want to use something like this in their code:
  #if TargetWin32 then
    // scale image with revised ImagePlay algorithm
  #else
     // use native Xojo routines for scaling
  #endif
I’d love to hear if this revised algorithm works for your Windows projects.
Here follows the code. Note that I realize the code is a bit untidy at this point, and a lot of code is duplicated. At some point I’ll clean up the code a bit.
Here goes… this is the best scaling method I could come up with, that is of a decent quality, and still relatively fast enough:
Function ScalePicture(p as Picture, newWidth as integer, newHeight as Integer) As Picture
  // based on code from Dr. Gerard Hammond

  // with performance/functional improvements by Tomis Erwin

  #if DebugBuild=False then
    #pragma BackgroundTasks false
    #pragma BoundsChecking false
    #pragma NilObjectChecking false
    #pragma StackOverflowChecking false
  #endif

  Dim pOut as Picture
  Dim s, sm As RGBSurface
  Dim o, om As RGBSurface
  Dim x,y,xMax, yMax As Integer
  Dim xx() as Double
  Dim c1, c2, c3, c4 As Color
  Dim xMult, yMult, a, b, xSub, ySub, xAdd, yAdd as Double
  Dim aPlusXAdd As Integer
  Dim bPlusYAdd As Integer
  Dim alpha As Integer

  s = p.RGBSurface
  sm = p.Mask.RGBSurface

  pOut= New Picture( newWidth, newHeight, 32 )

  o = pOut.RGBSurface
  om = pOut.Mask.RGBSurface

  xMax = pOut.Width - 1
  yMax = pOut.Height - 1

  yMult=p.Height / newHeight
  xMult=p.Width / newWidth

  a=newWidth/p.Width
  if a>.5 then
    xSub=.45
    xAdd=.5
  Elseif a<.5 then
    xSub=.75
    xAdd=2
  else
    xSub=0
    xAdd=1
  end

  a=newHeight/p.Height
  if a>.5 then
    ySub=.45
    yAdd=.5
  Elseif a<.5 then
    ySub=.75
    yAdd=2
  else
    ySub=0
    yAdd=1
  end

  Redim xx(xMax)

  for x = 0 to xMax
    xx(x)=(x * xMult) - xSub
  next x

  For y = 0 To yMax

    b = (y * yMult) - ySub
    bPlusYAdd = b + yAdd

    For x = 0 To xMax
      a = xx(x)

      aPlusXAdd = a + xAdd

      c1 = s.Pixel(a       , b  )
      c2 = s.Pixel(aPlusXAdd , b )
      c3 = s.Pixel(a       , bPlusYAdd)
      c4 = s.Pixel(aPlusXAdd , bPlusYAdd)

      o.Pixel(x, y) = RGB( _
      (c1.Red + c2.Red + c3.Red + c4.Red) \\ 4, _
      (c1.Green + c2.Green + c3.Green + c4.Green) \\ 4, _
      (c1.Blue + c2.Blue + c3.Blue + c4.Blue) \\ 4 _
      )

      c1 = sm.Pixel(a       , b  )
      c2 = sm.Pixel(aPlusXAdd, b )
      c3 = sm.Pixel(a       , bPlusYAdd)
      c4 = sm.Pixel(aPlusXAdd, bPlusYAdd)

      alpha = (c1.Red + c2.Red + c3.Red + c4.Red) \\ 4

      om.Pixel(x, y) = RGB( alpha, alpha, alpha )

    Next x

  Next y

  Return pOut
End Function
Talking about Xippet, To add a DropShadow to graphics in Cocoa does not works (as people added in comments) or we do not understand how to make it working.
To AKids: you can add a Property, a Method; add a Struct ! (Xojo).
Just curious, but did you try scaling using GDI+ on windows?
[code]Private Function scalePic(p as picture,width as integer, height as Integer,mode As Integer) As picture
dim res as new picture(width,height)
call GdipSetInterpolationMode(res.graphics.Handle(Graphics.HandleTypeGDIPlusGraphics),mode)
res.graphics.drawpicture(p,0,0,width,height,0,0,p.width,p.height)
return res
End Function
[/code]
with
Soft Declare Function GdipSetInterpolationMode Lib "Gdiplus" (graphics as int32, Mode as int32) As int32
Probably not perfect, but probably as fast as anything outside of a plugin, and pretty smooth for downscaling.
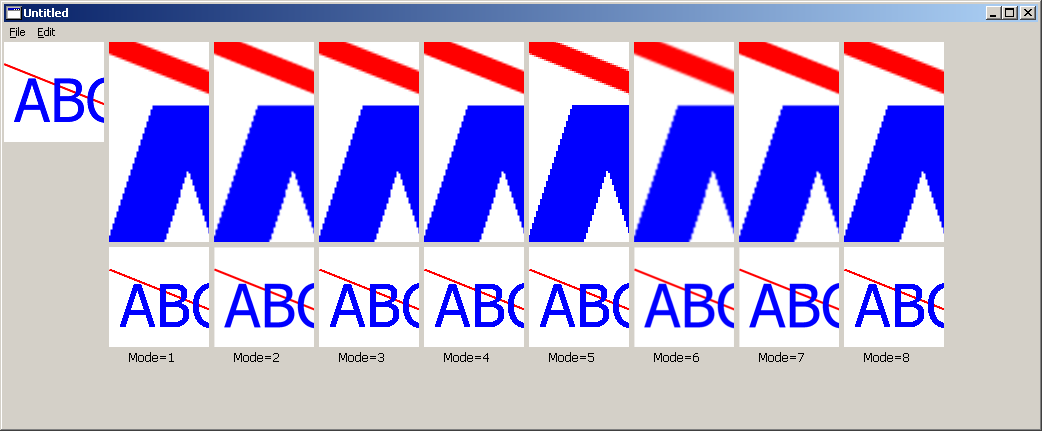
Top left is native Xojo with GDI+
Upper row is at 200%
lower is 20% scale
As an aside, the default Xojo is using is mode 3 (InterpolationModeHighQuality). I think the better quality modes are mode 6 (InterpolationModeNearestNeighbor) and mode 7 (InterpolationModeHighQualityBilinear)
Mode 5 is the fastest here (InterpolationModeBicubic) while mode 4 (InterpolationModeBilinear) is by far the slowest. Microsoft says that 8 (InterpolationModeHighQualityBicubic ) is the best, but it doesn’t look so awesome to me. I think the results may differ when scaling a photo vs graphical images… InerpolationModes
It will only compile on Windows (not Mac and Linux).
Here is a method that should compile on all platforms:
Function ScalePicture(p as picture, width as integer, height as Integer) As picture
  Dim res as new picture(width,height)

  #if TargetWin32 then

    // tell GDI+ to do quality scaling

    Soft Declare Function GdipSetInterpolationMode Lib "Gdiplus" (graphics as int32, Mode as int32) As int32
    Call GdipSetInterpolationMode(res.graphics.Handle(Graphics.HandleTypeGDIPlusGraphics), 7)

  #endif

  res.Graphics.DrawPicture(p, 0, 0, width, height, 0, 0, p.width, p.height)

  return res

End Function
Somewhere between Yesterday and Today I may think at that, but I certainly forgot a second later and never get the opportunity to compile it on Windows. This happens to me, sometimes.


