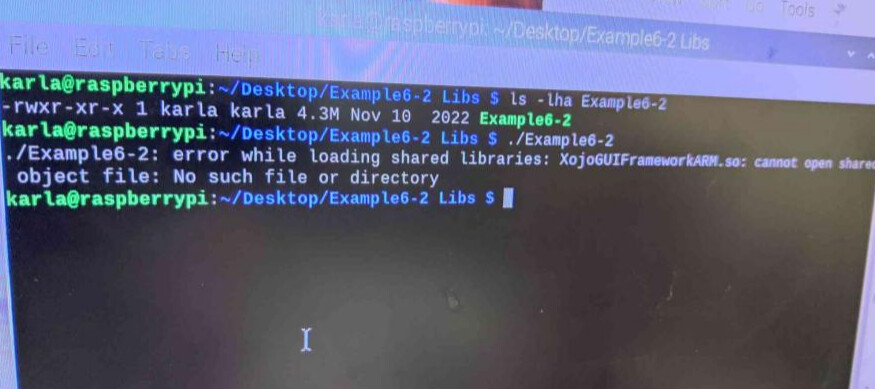
PIGPIO Library Installation

Hello Karla,

It appears that this program is using a Software PWM, and here is an example program that might work

L298NExample

I have not configured a L298N in your configuration, and this example program may help. Here is some more explanation:

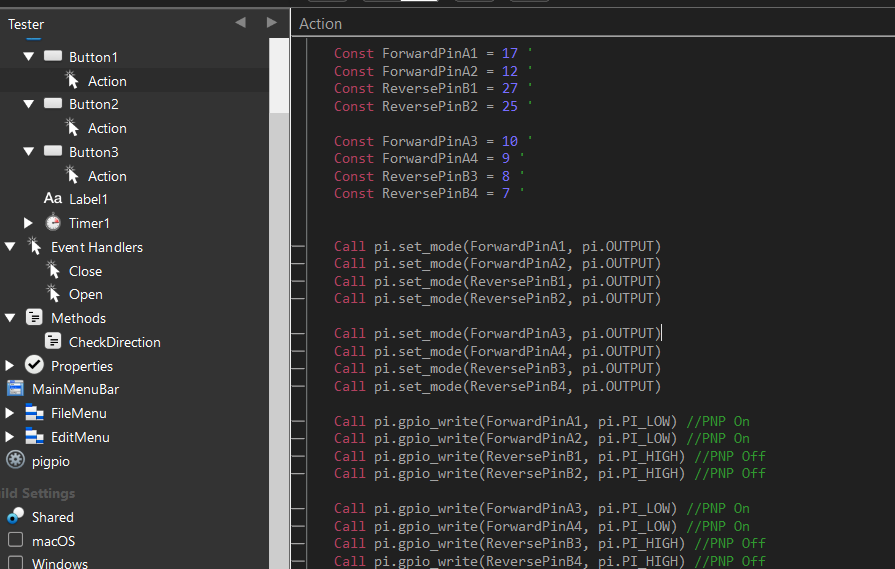
Public Property ENA As Integer
Public Property ENB As Integer
Public Property ForwardPinA1 As Integer
Public Property ForwardPinA2 As Integer
Public Property pi As pigpio
Public Property ReversePinB1 As Integer
Public Property ReversePinB2 As Integer

These public properties will hold data that is used in each of the buttons.

In an open event, the properties are assigned values, and the initial software PWM is setup.

Sub Open() Handles Open
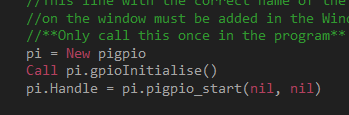
  //This line with the correct name of the class
  //on the window must be added in the Window1 Open Event
  //**Only call this once in the program**
  pi = New pigpio
  Call pi.gpioInitialise()
  pi.Handle = pi.pigpio_start(nil, nil)
  
  ForwardPinA1 = 23
  ForwardPinA2 = 24
  ReversePinB1 = 14
  ReversePinB2 = 15
  ENA = 25
  ENB = 18
  
  //Software PWM
  //Set the pin to send output
  Call pi.set_mode(ForwardPinA1, pi.OUTPUT)
  Call pi.set_mode(ForwardPinA2, pi.OUTPUT)
  Call pi.set_mode(ReversePinB1, pi.OUTPUT)
  Call pi.set_mode(ReversePinB2, pi.OUTPUT)
  
  //Set PWM range (0-255)
  Call pi.gpioSetPWMRange(ENA, 255)
  Call pi.gpioSetPWMRange(ENB, 255)
  
  //Set PWM frequency (800 Hz is common)
  Call pi.gpioSetPWMFrequency(ENA, 800)
  Call pi.gpioSetPWMFrequency(ENB, 800)
End Sub

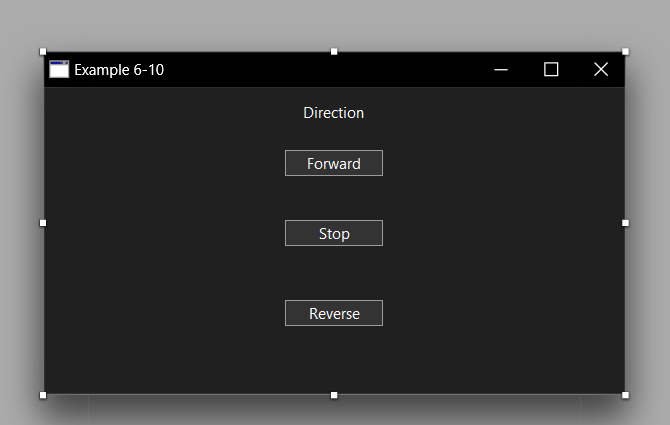
To make the PWM move the motor, the following code is placed in a button Action event:

Sub Action() Handles Action
  //Move Forward Button
  
  //PWM value 0 = low, 125 = 50%, 255 = High)
  Call pi.gpioPWM(ForwardPinA1, 0)
  Call pi.gpioPWM(ForwardPinA2, 0)
  Call pi.gpioPWM(ReversePinB1, 255)
  Call pi.gpioPWM(ReversePinB2, 255)
End Sub

Another button, lets call it Move Backward, may have code like this in the Action Event:

Sub Action() Handles Action
  //Move Backward Button
  
  //PWM value 0 = low, 125 = 50%, 255 = High)
  Call pi.gpioPWM(ForwardPinA1, 255)
  Call pi.gpioPWM(ForwardPinA2, 255)
  Call pi.gpioPWM(ReversePinB1, 0)
  Call pi.gpioPWM(ReversePinB2, 0)
End Sub

The duty cycle has a default range of 0-255, which can allow you to program different torque for the motor.

This is example code that was taken from Example 6-3 in the Raspberry Pi book.

I hope this helps. :slight_smile:

3 Likes

Hello, thank you for your help but the example doesn’t seem to be working. I am able to open the application on the pi, but when i press the buttons nothing happens. I have been trying to figure out what it might be and i cannot seem to get it.

I think its the way I might be running it, because I run the command
image
but then when I try to run the application it says " No such file or directory "
So instead I just click on the executable and execute
 could this be the problem?

I just made a direct path and it still didn’t work.


I checked my files to make sure it is executable 
 and I got this

I found this but not really helpful error while loading shared libraries

You should leave the build folder exactly as you get it out of Xojo.

You should see something similar to this:

Example6-2
Example6-2 Libs
Example6-2 Resources

In this directory, Example6-2 is the executable. The others need to be left where they are.

I tried the links in this thread and nothing was named “Example6-2” so I can’t provide a more illustrative guide.

Does it matter that when I build the only thing that comes out is

Example 6-2 Libs
Example 6-2

I have been copying these two files over to my USB then to the pi exactly how they are there

Example 6-2 is what opens when you download the zip L298NExample

It opens as L298Example, but the name says Example 6-2
image

The resources folder isn’t always included, but if it is you should leave it in place. I can see from your screenshot that you’re inside the Libs folder, so you aren’t in the right location. If you’ve moved the Example 6-2 executable into that location, that’s not going to work.

You’ll need to be on the level above the Libs folder (the one that contains an executable and the Libs folder) and run the executable from there. It will then locate the Libs folder and run.

Screen Shot 2022-11-10 at 16.32.25

I’m not entirely certain this is why the buttons aren’t working. It is why you aren’t able to launch from command line though.

Alright my problem was that I was typing sudo ./Example6-2
It runs when I just type ./Example6-2
The reason I had the folders misplaced was that I was trying different solutions lol

Now it gives me this:

image
But it is called


maybe i need to call it with every button instead of just once? Because it gives me that when I click the button to move forward or reverse

I ran it now with sudo ./Example6-2
and now it gives me this
image

Alrighty! I did sudo killall pigpiod and then ran the program again! No errors this time!

But, the program isn’t running :smiley: It does nothing :slight_smile:

Hello Karla,

Glad to hear that you are making progress, and a special thanks to @Tim_Parnell for all of his help!

Could you help me understand what ‘isn’t running’ and ‘it does nothing’ mean? For example:

  1. No window appears
  2. A window appears and there is no current/voltage from the pin
  3. The button becomes stuck,
  4. etc


Thanks :slight_smile:

The window appears, and I am able to press the buttons. But there is no movement whatsoever when the buttons are pressed.

I am currently trying your 6-10 example to see if it is because we are building with the driver. So I wanted to see if something easier works. But I am having the exact same problems.

The window appears, all buttons work, but there is no movement of the motor.

I MADE YOUR EXAMPLE 6-10 work! It was just not enough power! But it worked. So now I know that I can make a proper connection from the app to the pi.

I tried making 2 Hbridges to have the 2 motors working, because I don’t have the chip you are using in your example at the moment.

The problem with this try is that the 2nd motor that I added works, but now the first one doesn’t anymore.

I think its because the 4 transistors that are used on one bridge, are different to the transistors used on the other bridge, but I am not sure.

I have 3 options:
Make the motors work with 2 hbridges
Make the motors work with the IC chip instead
Or
Make the driver work, which was the original plan.

1 Like

Hello Eugene! I wanted to ask how I can make the Hbridges work with regular buttons. I am making it work. But once I press forward, it only goes forward. I try to press stop, and it stops for 1 second. Same thing with reverse. Do I have to add some timer?

This is the code for Forward:

The code looks the same for stop and Reverse just with different High and lows ofc.

image

This is the Idea.

Also, ended up making the two Hbridges work perfectly. Now, I am making changes to the app so the buttons look like this. But now it is different.